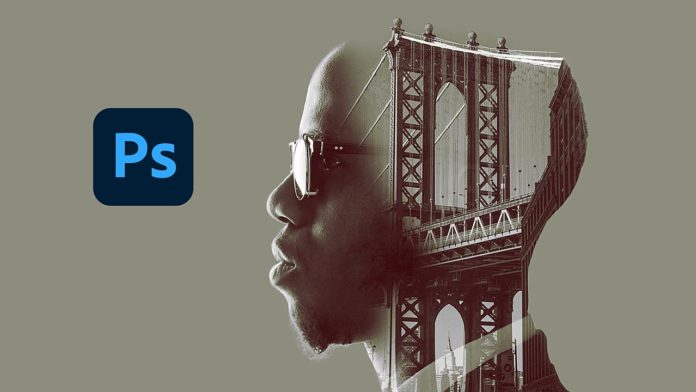
The Double Exposure Effect is pretty easy to create in Photoshop. Usually, you would combine 2 images together. In this case, we are going to use a side portrait and an image from New York.
First, desaturate the portrait because we are going to need a black & white image and this works best when the portrait is desaturated. You could do that with an adjustment layer or in the menu under ‘Image -> Adjustment -> Desaturate‘.
Combine both images and set masks
Now add the second image to our profile image and place it on top. To help find the right position just decrease the opacity and resize/reposition so you end up with a nice-looking composition. Here we want the buildings on both sides of the image to cover the face of the portrait and the back head.
Now with our second image (let’s call it foreground image), we want to create a mask. For that CTRL / CMD + click on the little preview image of the portrait layer to create a selection. Remember the portrait as isolated already so the background is transparent.
With the selection created click on the foreground image so it’s selected. Now desaturate this layer as well, so once again go to ‘Image -> Adjustments -> Desaturate‘ so it’s black & white.
Tweak masks to create the double exposure effect
Now we want to bring back certain areas and details of the portrait below. In order to do that click on the layer mask so it’s selected, select a brush with a black color and start painting into the layer mask. This will bring back the painted areas and basically remove those painted parts from the foreground layer. Remember we are working non-destructively and not removing anything from the actual image. We are still tweaking the mask.
To blend things together you might want to tweak the opacity of the foreground layer. Now duplicate the background layer (our portrait) and move the duplicate on top. Set the blend mode to ‘Lighten’ and the opacity to 50. This will blend things even more and our double exposure effect will start to come together.
To support the effect we want certain areas of the foreground layer to be fully visible. For that duplicate, the layer set the opacity back to 100 and start painting into the mask. This will blend into the background color that we will be creating in the next step and emphasize the double exposure effect even more.
Pro Tip: If you want to double-check your mask just ALT / OPTION + click the layer mask icon and Photoshop will show you just the black & white mask. Click again to toggle everything back.
The last step is to create a background solid color which we will sample from the sky area above the bridge from our foreground layer as seen in the tutorial above. To create a solid from the adjustment layer icon on the bottom of the layer panel. Drag it below all other layers and sample the color from the foreground layer.
As a final tweak, we want to mask out (or rather obscure) the hair from the portrait so it looks like the bridge from the foreground layer is growing out of the head. For that just copy the solid layer, move it to the top, apply a mask and invert it (CMD / CTRL + I). When you now paint into the layer mask with a white color this area will be brought back.
Add subtle color effects to make it pop
To make everything pop a little more you could merge everything to a new layer (CTRL/CMD + SHIFT + ALT / OPTION + E) and set the layer blend mode to ‘Soft Light’. Tweak the opacity a little bit.
With some curves adjustment and an additional gradient map, you can give your composition a cool color tint and that’s it. That’s your Double Exposure Effect!
