Fading audio is something you will do a lot when editing your videos. The ‘How To Fade Audio In Premiere Pro‘ tutorial will get you up and running with the basic techniques when you have to create a nice and smooth audio transition for your next edit.
How To Fade Audio In Premiere Pro
- Select the clip you want to fade out.
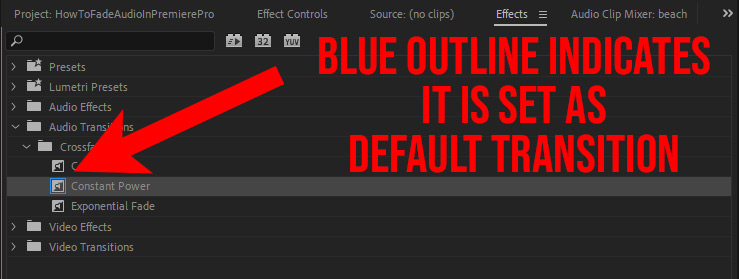
- Drag the effect ‘Audio Transitions > Crossfade > Constant Power’ onto your clip.
- You can also use the Shortcut CTRL/CMD + SHIFT + D (default audio transition)
- Extend the length of the transition by dragging the effect or in the dialog (double-click the transition).
This of course will not just fade out a clip but also transition between 2 clips when applied to an edit.
Sometimes you’ll have to do it manually to have more control over the fade-in or fade-out effect. For that, you can place keyframes on the volume manually with the Pen Tool. Either switch to the Pen Tool in the toolbar or just use the shortcut ‘P’.
How to Manually Fade Audio In Premiere Pro
- Extend the height of the audio waveform so you can see the volume line.
- Hold CTRL and click on this line to add a keyframe.
- Drag up (higher audio level) or down (lower audio level) to animate the volume.
- Drag the keyframes to fine tune the fade in/out.
Most of the time you will work with the ‘Selection Tool‘ (V) so you can switch to the ‘Pen Tool‘ on the fly by holding the CTRL/CMD key while hovering over the volume line. Note that this switching with the CTRL/CMD key only works while working in the ‘Selection Tool’!
You might also like: 10 Smooth Transitions For Adobe Premiere Pro
When you double-click the transition in the timeline, you can fine-tune it in the ‘Effects Control Panel’ for instance change the duration and/or position.
How Do I Set This Default Audio Transition?
If you noticed, we applied the audio transition with the shortcut CTRL/CMD + SHIFT + D. What if you need to set another audio transition as a default? That also easy to do, just go to the desired transition in the ‘Effects Panel’, right-click the transition, and select ‘Set Selected As Default Transition’. The default transition is indicated with a blue line around the icon. That’s it, from now on when you are using the shortcut, this transition will be set by default.

By the way, that’s the same thing you would do if you want to change the default video transition. Just go to the transition, right-clilck and set as default.
There are a couple of other options when it comes to controlling your audio level via the ‘Audio Clip Mixer‘ and ‘Audio Track Mixer‘ but that’s for another tutorial. If you want to quickly fade in or fade out a clip in Premiere Pro, this is the way to do it.


