
How To Add Text In Premiere Pro
- Select the ‘Type Tool’ in the toolbar.
- Click and/or drag in the program monitor, which will create a graphic asset in the timeline.
- Type your text.
- Tweak the setting in the ‘Effects Control Panel’ or the ‘Essential Graphics Panel’.
- If don’t see it, open that panel under ‘Window – Essential Graphics Panel’.
- Here you can also add multiple text boxes and even shapes to the graphic asset and arrange them.
- right-click the (text) graphic asset in the timeline to export as Mograph Template (.mogrt) (Export As Motion Graphic….).
- Now, this is available in the Essential Graphics folder, you can just drag and drop it on your timeline.
Adding text in Premiere Pro seems like a no-brainer, but there are a couple of options we should take a look at. And a couple of cool things you can do that are not instantly obvious.
Add Text In Premiere Pro Using The ‘Type Tool’
The first step is pretty obvious, just use the ‘Type Tool‘ and click or drag in the program monitor. This will create a textbox and also place a graphic asset in your timeline which will contain this text object.
You might also like: 5 Free Title Presets For Adobe Premiere Pro
From here you can tweak the settings like font and size in the ‘Effects Control Panel‘ as well as in the ‘Essential Graphics Panel‘. While this is basically the same, you can also add shapes in the ‘Essential Graphics Panel’, which you can use as a background for the text or a divider like in this tutorial.
Adding effects like stroke or drop shadow is pretty self-explanatory. Just check the according box in the settings. It also comes with its own transform settings. You have the same controls in the ‘Essential Graphics Panel’ like paragraph and alignment.
Adding Text In The ‘Essential Graphics Panel’
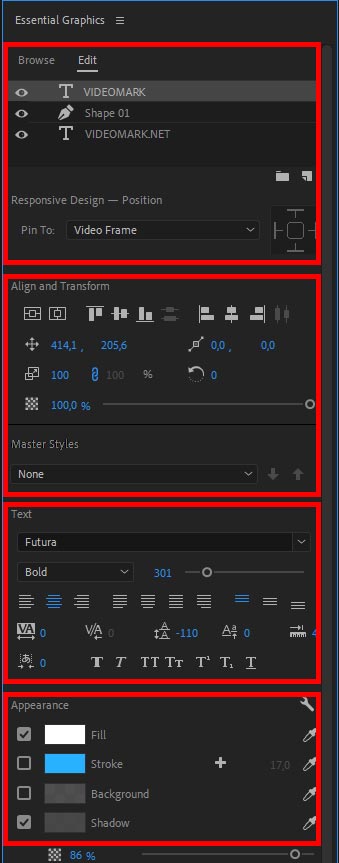
When we take a closer look at the settings in the ‘Essential Graphics Panel’ you can see that it’s divided into 4 sections where you can adjust the look of your text.
The first section contains the text boxes as well as additional graphic assets like shapes. This works like a layer stack in Photoshop so you can basically move things around if you want specific elements in the foreground and a shape in the background for instance.
In the second section, you have all the controls for position, scale, rotation as well as the alignment of your text and shape elements. You can also control the individual opacity here.
The third section will let you select the font as well as the justification. You have many other controls like kerning and line-height.
And finally the fourth section you can add effects to your text like stroke or drop shadow, just by checking the according box and selecting the desired color. You could also use the color picker on the right-hand side to pick a specific color (from a logo graphic for instance).
Create A Template With Motion Graphics Templates (.mogrt)
When you right-click and select ‘Export As Motion Graphics Template‘ you can save it out as a template. This will create a .mogrt file which will be listed in the local folder in the ‘Essential Graphics Template‘. You can also do this in the menu with ‘Graphics > Export As Motion Graphics Template‘. Now you can go ahead and drag it into the timeline in any new project. You can as well use it in the same project, just so you don’t have to repeat the steps again and use the same design while just changing the text.
There is a lot more you can do with Motion Graphics Templates like adding input fields etc. which we will talk about in later tutorials. But for now, just remember you can save out your text(field) by exporting as a .mogrt. Needless to say, this is also a very convenient way to share text designs with co-workers and other editors.