
How To create the reactive audio spectrum effect in After Effects:
- 1. Create a solid
- 2. Apply a mask to the solid and set it to ‘none‘
- 3. apply the ‘Audio Spectrum‘ effect to the solid
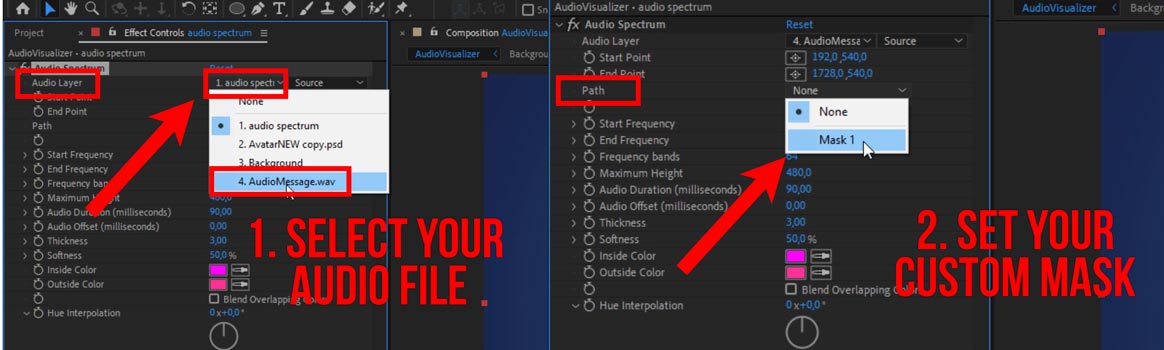
- 4. Set ‘Audio Layer‘ to the desired audio file in your comp.
- 5. Set ‘Path‘ to the mask you just created
- 6. Adjust settings like ‘Frequency‘ and ‘Maximum Height‘ to your liking
In order to create this audio spectrum effect you first need an audio file. So go ahead and import that into After Effects and drop it into your composition.
Create a solid & mask to hold the effect
Next, we are going to create a solid. This is the ‘container’ where the actual effect will be applied to. Once you created a new solid name it ‘spectrum‘. Now apply a mask to this solid, which is going to determine the shape of the audio spectrum animation.
With the ellipse tool selected start dragging from the middle of the canvas (with the solid selected) and hold down the CTRL/CMD + SHIFT key. That will drag a mask from the center of the canvas. Change the mask type from ‘Add‘ to ‘None‘ because we only need the path of the mask and don’t need to see the color of the actual solid. Remember the solid will basically just hold the audio spectrum effect.
Assets ready now apply the ‘Audio Spectrum’ effect
Now with everything in place we are ready to add the actual effect. So over in the ‘Effects & Presets‘ panel search for the ‘Audio Spectrum‘ effect and apply it to the solid.
Here in the ‘Effect Controls‘ under ‘Audio Layer‘ select the audio file you just had added to the composition initially. When you do a RAM preview now you should already see little lines animating in the middle of the canvas already. However, per default, the lines are arranged horizontally. We are going to change that now with the mask we had just created.
Pro Tip: if you want to preview audio in your composition but not actually render the canvas (just to monitor the audio) hit the ‘comma’ key (,) on the Numpad. That will play the audio without actually rendering the visuals.
So now head over to the ‘Effect Controls‘ for the audio spectrum effect once again and under ‘Path‘ select the mask we had just created. Should be named ‘Mask 1’ unless you changed the name. You should see a significant change right away, the animating lines are now following a circular shape, exactly like the mask.
Tweak settings for the desired final look
From here is just a matter of tweaking the settings to your liking to create the desired effect. In the tutorial above I’m increasing the number of ‘Frequency bands‘ to 128 so we have more animated lines. Then increasing the ‘Thickness‘ to about 8. We’ll leave the colors as is for now.
Decreasing the ‘End Frequency‘ to about 500 will give you are more rounded look. ‘Maximum Height‘ as the name implies will control the height of the animated lines.
By adding a few more tweaks, like adding a ‘Glow‘ effect, you can even amplify the effect of the animated lines and give it a final touch.
Great way to repurpose your audio content for video
As you can see it’s pretty easy to create this popular effect. It’s a very easy way to use audio files and repurpose them for the desired video platform. Or just visualize your Podcast to upload it to Youtube or other video platforms.
In some of my tutorials I only have an audio file (no video) and when these are played muted the viewer may not initially understand that there is a voice-over. So this will indicate that there is a voice-over when played muted.
So there are a couple of scenarios where this effect comes in handy.