
To match colors in Photoshop with just 3 easy clicks follow these steps:
How To Match Colors With 3 Clicks
- Create a curve adjustment layer.
- Create a clipping mask for this layer with the layer below (alt/option click between the layers)
- double click the shadows, mid-tones, and highlights eyedropper and sample the according color from the background.
- click the eyedroppers and apply the colors to the foreground layer.
- Apply a color lookup table LUT to both layers to make them blend even better.
To match colors between 2 layers easily with a curves adjustment layer just create a ‘curves adjustment layer‘. To limit the effect of this adjustment layer make sure you set the layer below as a clipping mask. Either alt/option click between the adjustment layer and the layer below or click the according icon in the Curves properties.
You might also like: How To Use The Pen Tool In Photoshop
Now that you have created the curves adjustment layer you need to sample the shadows, mid-tones, and highlights from the background layer you want to match your colors to. Just double-click the shadows eyedropper and sample the darkest color of the background layer. Do the same for mid-tones and highlights. Photoshop will ask you if you want to ‘save the new target colors as defaults‘? Click ‘Yes’. This will remember the newly sampled colors and not reset them every time you leave the properties of the curve.
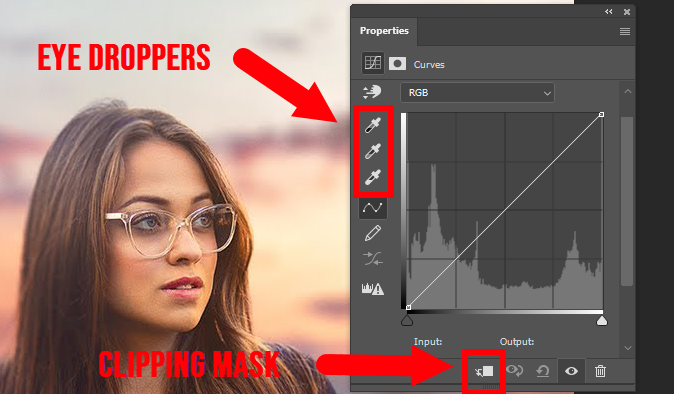
Now open up the properties of the curve again and click (not double-click!) the eyedropper to assign the colors you just sampled to the according shadows, mid-tones, and highlights of your foreground layer. And that’s it! This is how to match colors in Photoshop with 3 easy clicks.
To blend both layers even better you can create a ‘color lookup‘ adjustment layer on top of both layers (no clipping mask) and apply a LUT. Set the blend mode to ‘soft light’ and decrease the opacity to a low value. This is just a helper to bring both layers even closer and really match the colors.
You can experiment with more effects like blur and adding flares to make the final result pop a little more.