
Mastering the Pen Tool in Photoshop is actually not as hard as you might think. It basically boils down to understanding a few simple steps to create even complex hard-edge masks and be much more efficient when working in Photoshop.
How To Use The Pen Tool In Photoshop – Quick Guide
- Select the Pen Tool.
- Click on the layer/canvas to create the first point.
- Click again to create a second point and connect with a straight path.
- Click and drag to create a curved point with how to use pen tool in photoshop.
- Hover over a point to remove it.
- Hover over a segment to add new points.
- Hold ctrl/cmd to tweak the bezier handles or move a point.
- Hold alt/opt to break bezier symmetry and change path direction.
To work with the Pen Tool you need to understand that it basically works like vectors. The path you are creating can have either curved points or regular anchor points. When you select the Pen Tool and click on the canvas you will create your first anchor point. Clicking somewhere else on the canvas will create another anchor point and connect them.
If you now keep clicking on the canvas and create a path maybe around an object you can come back and close the path by clicking on the very first point. Congratulations, you created your first path in Photoshop.
I Need More Control Over My Points?
Of course not all objects you might want to isolate have straight lines. To create a curved point just click and drag to create so-called bezier handles. These handles determine the curvature of the point and can always be adjusted to match the curve that you are trying to trace.
By default, these handles are symmetrical which means they are equal on both sides. Sometimes you might want to create a hard turn of the path though. For that just hold the alt/option key and start dragging. That will ‘break’ the bezier handles and let you handle each side independently.
When you hold the alt/option key and click on a point with bezier handles, that point will turn back into an anchor/corner point.
You Might Also Like: How To Freeze Frame In Premiere Pro
How Do I Add/Remove Points From My Path?
To remove a point while using the Pen Tool just hover over the according point (the cursor will indicate that by a small minus icon). Now when you click on that point it will be removed from that path. If this doesn’t work properly make sure the option ‘Auto Add/Delete’ in the toolbar is checked. This will also add new points to an existing path. Just hover over a segment (the cursor will indicate a little plus icon) and click. This is great to work around your object quickly and fine-tune your path by adding new points.
If you have clicked away or stopped creating your path just select your path with the ‘Path Selection Tool’ (black arrow). To select individual points use the ‘Direct Path Selection’ Tool (white arrow).
How Do I Turn This Into A Vector Mask Now?
Now that you have created a nice path hold down the ctrl/cmd key and click on the mask icon below the layer panel to actually create a vector mask on your layer. To toggle the mask on and off just hold down the shift key and click the little gray icon which represents your vector mask. You can also right-click anywhere on the canvas and select ‘Create Vector Mask’ from the context menu. Here you also have the option to create a regular selection with the option ‘Make Selection…’.
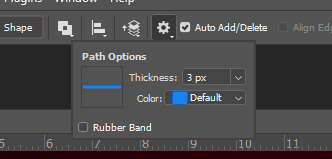
Further Settings for the Pen Tool
In the path options above the canvas you can control a few settings that can make your life a little easier when working with the Pen Tool. You can control the color and thickness of the path, which is will help for the path to stand out from the background. You can also check ‘Rubber Band’ which will give you a preview of the path before you even click for the next path point.
Conclusion
Making selections are an absolutely essential part of working in Photoshop and when you master the Pen Tool, you have a very powerful tool at hand to create complex masks. It takes a little practice to get used to the concept of corner/anchor points and bezier handles. But once you get used to it, you will create vector masks super quickly. Head over to the tutorial below to follow along and see the Pen Tool in action.