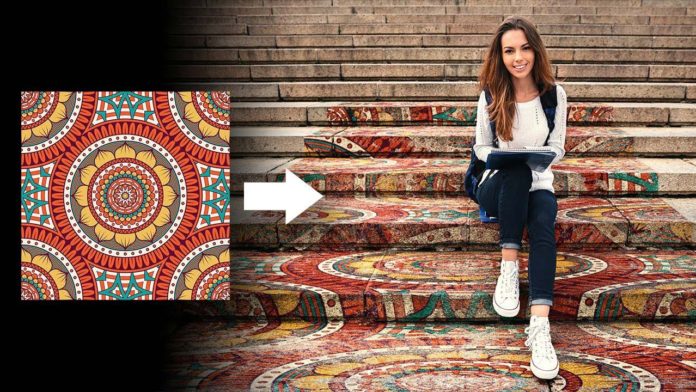
Adding Graphics to complex perspectives in Photoshop might look a little intimidating at first glance, sometimes your graphics don’t always look great. That is because your graphic is added onto a flat surface rather than the perspective. And this does not always look so great. In this guide, we are going to show you how to add the graphics and keep the perspective of the original image.
Defining your Perspective in Photoshop
The feature we are talking about is Vanishing Point. Once you have your image loaded, you will select the vanishing point feature and start setting your perspective of your image for your graphics. You will find this feature under the filters menu. You set your perspective by creating a plane with boundaries that Photoshop can use to create the perspective. Remember to always look for BLUE planes and not RED planes, the blue plane will create the best results for your image. Use your zoom and scroll to adjust the plane 100% so that you have a great starting point for your vanishing point. Extend your plane to the size you want by extending the sides accordingly. You will see that the plane stays in perspective.
You might also like: How To Use The Pen Tool In Photoshop
Creating the Perspective on All Planes
As you can see we need a perspective plane on each of the steps in our example image. So all you have to do is create a new plane from the drag points on the current plane. Use CTRL + C to create a new plane and extend it off the center points to create your planes on each of the steps (example image). As you can see the planes will follow the contours of your image and this way you are creating the perspective for your graphics. The angle at which the planes will be created can be set at the top of your screen.
VERY IMPORTANT – always make sure that your planes are accurately set to the perspective so that you get the best results. This is where you zoom in and fine-tune the placement of each plane before you go on to the next one.
Duplicate the Planes as You Need
Once you have the first two planes set, you need to create the duplicate planes on all the surfaces that you need. This will create the perspective surface for your graphics and give you fantastic results. Once this is all done you have not created the perspective that you will instruct Photoshop to use for your graphics. Click OK to confirm your perspective.
Inserting Your Graphics on your Image
You will see that if you go and paste a graphic over your image now it will paste as if it’s on a flat surface. This is correct because you still have not instructed Photoshop to apply the perspective. What you need to do is create a layer for your “perspective graphic” and copy your graphic on top of the vanishing point grid that you created. Then you just drag and drop it onto the grid and you will see the graphic following the perspective of your image. Use your transformation commands to correct the size of your graphic to fit the perspective plane properly.
Always remember to make sure you have no gaps between your graphics. Adding graphics to complex perspectives in Photoshop is not difficult. Play with this process until you have mastered it and you will have a spectacular way to create graphics on any images, no matter what perspectives or medium. When you have mastered a few other techniques in Photoshop such as matching colors, you will be able to create incredible compositions in no time.


