
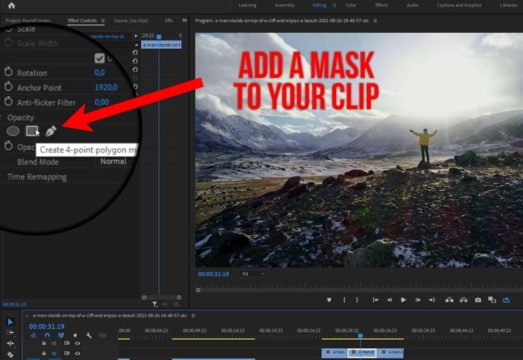
So there is one specific technique everybody is using when applying round corners to their clips in the timeline. But there is a much easier technique to achieve this with just 3 clicks. For that just apply a mask to the clip and increase the mask expansion!
First click on your clip in the timeline and head over to the ‘Effect Controls’. Here under ‘opacity’ click the little rectangle to add a mask.
Now scale the mask so it barely covers the whole video. Pro Tip: when you hover over the mask in the canvas and hold the shift key, you can scale the mask!
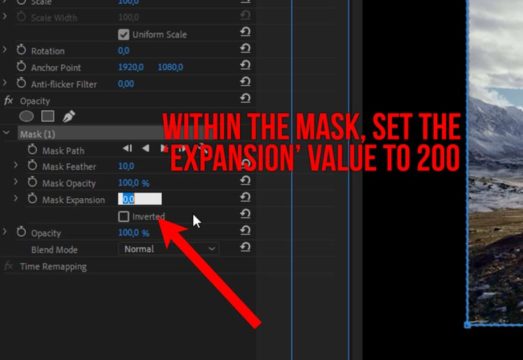
Now with the mask set, set the ‘Expansion’ value within the mask to something very high. Maybe like 200. You can still tweak this value to your liking.
Once the expansion extends outside the mask, it will give you the rounded corners look you are after. You can also control the size of the rounding by adjusting the size of the mask. The smaller the mask and bigger the expansion, the bigger the rounding!
One thing to note though, by default the mask is feathered slightly. In order to create the round corners look just set the ‘Mask Feather’ value to zero.
As you can see, it’s just a matter of a few clicks (actually 3 clicks!) to create that round corners effect in Premiere Pro. Rather than using a shape asset via the essential graphics panel we just utilized a default mask and it’s expansion value to achieve the same result!
How To Create Round Corners in Premiere Pro:
- Add a mask to your clip
- Scale the mask by holding the shift key
- Increase the ‘Mask Expansion’ value of the mask
- To control the size of the rounding adjust the mask size
- Set the Mask Feather value to zero! (it’s feathered slightly by default)