
To become a rockstar Motion Designer, you have to fundamentally understand masking in After Effects. And the first and most basic way of masking is the Track Matte effect. Well as you can see in the ‘Track Matte In After Effects’ Tutorial above, it’s more a layer setting than an effect:
How To Set A Track Matte In After Effects
- Select the layer you want to mask.
- If layer transfer controls are not visible, click the toggle icon (lower left) to expand the pane.
- The mask layer must be right above the background layer you want to mask.
- Set the Track Matte to either ‘Alpha Matte’ (mask transparency) or ‘Luma Matte’ (mask brightness).
- With alpha, you will knock out the transparent areas, with luma you will knock out the black areas.
- If you need to invert the mask, just select ‘Alpha Matte Inverted’ or ‘Luma Matte Inverted’.
- To repeat the process with the mask layer, copy the mask, and place it above the new background layer.
If you don’t see the ‘Track Matte’ settings, just click the control pane in the lower left corner below the timeline to toggle it on and off.

Here you have basically 4 settings to choose from. Alpha Matte (+ inverted) and Luma Matte (+ inverted). What this basically means is, if you have a layer with transparency that you want to use as a mask, use Alpha Matte. Like the first example in the tutorial above, a regular text layer.
If you have a black & white image, which is pretty common in 3D animation, for instance, you want to use ‘Luma Matte‘. This will knock out the areas that are black in the mask layer and keep those that are white. You can technically use any color image with this setting, doesn’t have to be black & white, just keep in mind that the brightness value will change, and thus the (un)masked areas might be slightly transparent.
But I Don’t Want To Copy The Mask Over And Over Again
So, the ‘Track Matte‘ is a no-brainer when you have very simple compositions. Workin in After Effects can get pretty complex quickly as you know. Copying the mask over and over again will clutter your composition very quickly. That’s where the ‘Set Matte‘ Effect comes in. That’s a real effect, so head over to the ‘Effects Panel‘ to add it to the layer you want to mask.
You might also like: Free Movie Title Opener For Premiere Pro
Under ‘Take Matte From’ you can select any layer from this composition. Doesn’t have to be above the layer that you are using this effect on. That’s the beauty of it. You can have one dedicated mask layer or asset. The text layer in this case. And target that with the ‘Set Matte’ effect from anywhere in the composition.
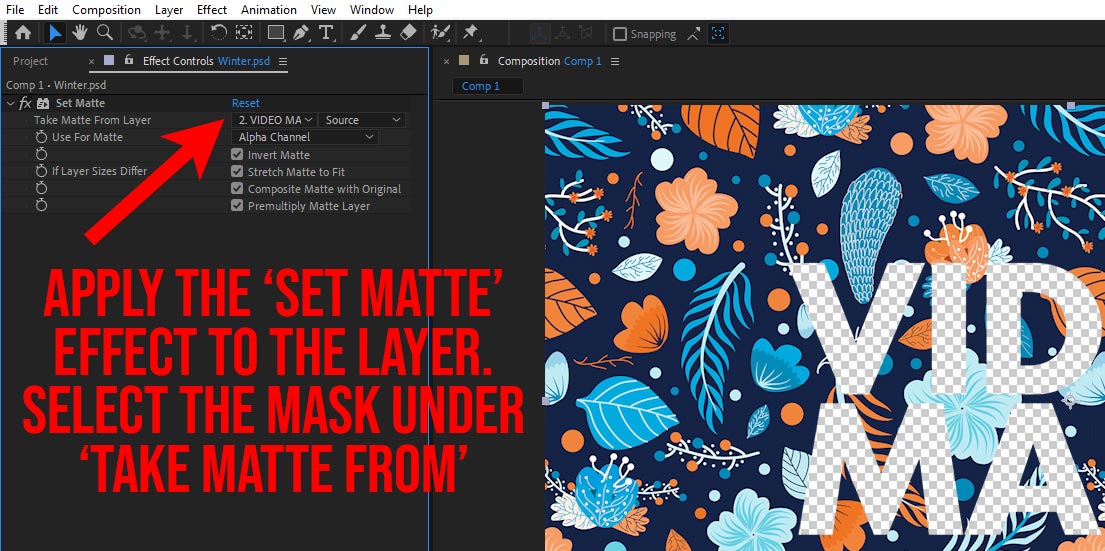
the ‘Invert Matte‘ check box does exactly what it says, it inverts the mask. Just keep in mind that unlike the ‘Track Matte‘ setting (let’s call it a setting, because technically it’s not an effect) this ‘Set Matte’ doesn’t hide the mask automatically. You have to hide it manually. In most cases, that’s what you want to do.
There are a couple more options in the ‘Set Matte‘ effect which we will cover in a later more in-depth tutorial. But for now, I wanted to keep it simple and give you a quick overview of the most common options when setting a Matte in Adobe After Effects.