How To Freeze Frame In Premiere Pro
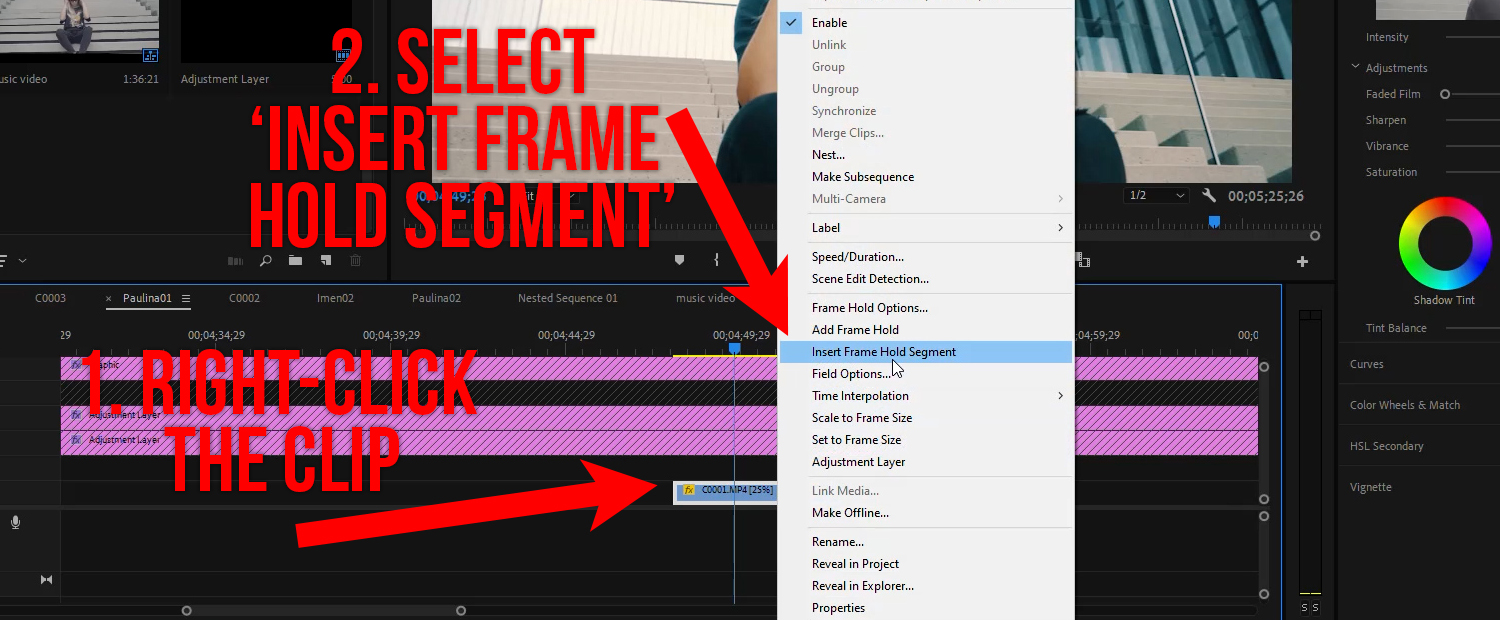
- right-click the clip on your timeline.
- Select ‘Insert Frame Hold Segment’.
- It will add 2 seconds of freeze-frame at the playhead position.
- Adjust the length of that freeze frame with the ripple edit tool.
- When playing the clip the frame will freeze and continue playing after that segment.
The freeze-frame ‘effect’ is actually something you will need a lot when editing video, no matter if it’s in Premiere Pro or any other editing software. In Premiere, it’s very easy to do when you know where to actually find the according option.
To add a freeze-frame or rather ‘hold frame’ as it’s technically called in Premiere, just right-click the clip in your timeline and select ‘Add Frame Hold’. How that frame hold will be added to your clip depends on the settings under ‘Frame Hold Options’. Here you can select if you want the freeze-frame to happen at the playhead position, at the In-Point, or the Out-Point of the clip.
The difference between hold frame and frame hold segment is just, that hold frame, as the name implies, will hold the frame at the position set in the frame hold options.

The Good Old ‘Export Frame’ Function
You could as well build a freeze-frame ‘by hand’ by just exporting a frame, re-importing it, and pasting right at the position you exported it from. This can come in handy when you want to process that frame outside Premiere Pro, maybe add some effects in Photoshop or After Effects.
One thing to note is that this way of doing it might have a positive impact on the performance, as I have noticed that a freeze-frame with the hold function might be a little demanding when trying to play the timeline and later exporting the video. Basically the same thing as in After Effects when you pre-render heavy compositions with many effects.
You might also like: How To Reverse A Clip In Premiere Pro
Extend The Duration Of The Freeze Frame
While ‘Insert Frame Hold Segment’ is adding a certain length to the clip you might actually want to control the duration. For that just select the ripple edit tool (Shortcut ‘B’) and start dragging on the Out-Point of the clip. That will extend or shorten the freeze-frame duration and move the rest of the clip accordingly without leaving any gaps.
Pro Tip: When you hold the CTRL/CMD key the cursor will switch to the ripple edit tool while hovering over any edit. So you don’t actually have to switch tools and can work much faster when working in the timeline.
