
When editing your videos in Premiere Pro you can speed up the process with a number of useful shortcuts and techniques. Here are 7 useful techniques in Premiere Pro to work smarter and faster:
1. Copy/Paste/Remove Attributes
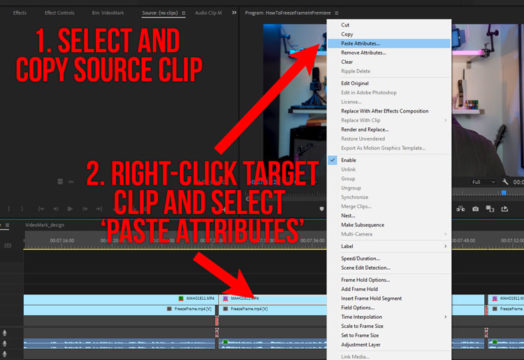
Let’s say you have tweaked a clip in your timeline and added a bunch of effects on top of it and now you want to apply the same to other clips in your timeline. Doing that with each clip separately would be very tedious and time-consuming. To copy/paste everything you did to that one clip, just copy that first clip (you can use the common CTRL/CMD + C shortcut) as if you just wanted to copy/paste the actual clip.
Now select the clips you want to apply it to ((can be one or multiple clips) and rather than using the paste command just right-click and select ‘Paste Attributes’. This will open a menu where you can select what exactly from that source clip you want to apply to these other clips. To ignore specific effects just uncheck them in this window and you’re done.
To remove attributes from a clip altogether just right-click and select ‘Remove Attributes’.
How To Copy/Paste/Remove Attributes in Premiere Pro:
- Select Clip
- Copy Clip (CTRL/CMD + C)
- Select New Clip (or multiple clips)
- Don’t paste! – just right-click and select ‘Paste Attributes’
- In The Pop-Up window uncheck attributes you want to exclude
- To remove attributes select clip, right-click and select ‘Remove Attributes’
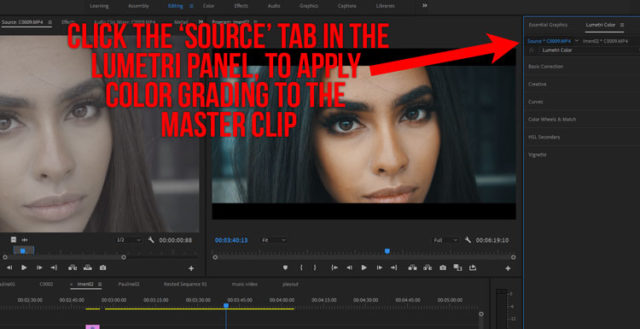
2. Lumetri Master Adjustments
When you have multiple edits from the same master clip in your timeline and want to adjust the overall look of the clip, not just the individual clips just head over to the Lumetri Panel and select the ‘Source’ tab. Everything you apply here will affect the original (source) clip so you don’t have to go through each edit individually, but tweak all edits in one step.
3. Cropping Video For Social Media
If you want to post your FullHD video (1920×1080) to Instagram in a square ratio just go to the sequence settings and set the ‘Frame Size to 1080 by 1080. You can also apply the new effect ‘auto reframe’ to the clip. This will analyze the main focus of the video and auto-apply keyframes to keep that main element in view. This will save you a lot of manual keyframing. However, if you wish you can still override those auto keyframes and adjust them by hand.
IMAGE
4. Speed Up Your Editing
There are a number of shortcuts to speed up your editing. You can use the ‘Shuttle left/right keys’ (J and L key) to play through the timeline forward and backward. Pressing the same key multiple times will speed up the playback speed. That way you can go through the clips very quickly and plan your edits. Press the ‘K’ key to stop playback.
To place a cut at playhead position (add edit) just press ‘CTRL/CMD + K‘. That will cut the selected clip right at the playhead position. If you want to cut ALL clips (not just the selected one) press the same command, but without any clip selected. That will cut at playhead position across all clips on the timeline.
The ‘Q’ and ‘W’ keys are great to quickly ripple edit clips relative to your playhead. When you select a clip the ‘Q’ key will delete everything to the left of the playhead and close the gap. The ‘W’ key will delete everything on the right side. In combination with add edit, you can go through your timeline and create rough cuts very quickly.
5. Move Clips Across Tracks
To move clips to other tracks quickly just use the shortcut ‘ALT/OPTION + up/down arrow’, which will move the clip to the track above or below. When there is no track above, it will create a new one on the fly. That’s a convenient way to create new tracks quickly.
To nudge the clip over by 1 frame just use ‘CTRL/CMD + right/left arrow’. To move it in 5 frame increments add the shift key.
6. Default Transitions
Th apply the default transition, select the clips you want to transition and hit ‘CTRL/CMD + D’.
To set the default transition, just find the according transition, right-click and select ‘Set Selected as Default Transition.
Pro Tip: You can do the same with audio clips, the only difference is you have to add the shift key so it’s ‘CTRL/CMD + SHIFT + D’.
Conclusion
No matter what type of videos you are editing in Premiere Pro, most of the time you will probably do most of these steps. And with these techniques, you can speed up your workflow significantly and reduce click mileage.