
One question that frequently comes up when learning motion design is how to create fake 3D motion in Adobe After Effects. This is definitely something a motion designer should have in his or her toolbelt.
Mike from Mobox Graphics is showing us a technique where you can create a diamond shape rotating in 3D. Well, it appears to be 3D but actually just creating the illusion in 2D motion.
Creating The Base Asset In Adobe Illustrator
Start off by creating the base shape of the diamond in Adobe Illustrator. This can be done with shapes right within After Effects but since creating assets in Illustrator is a common workflow it doesn’t hurt to fire up Illustrator once in a while. Once that base form is created, just duplicate and delete some segments to end up with the piece that will be moving across the base shape to create the illusion of 3D, just like in the picture below:
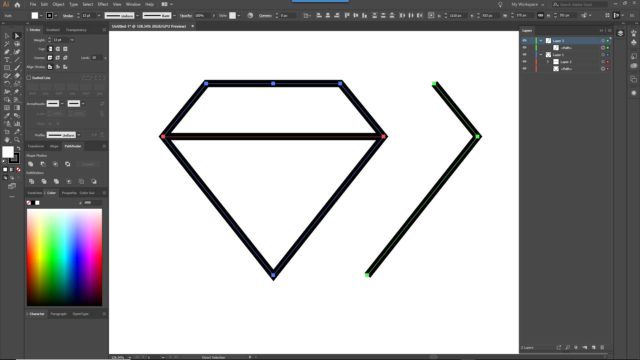
With this done, back in Adobe After Effects, create a new composition and import the .ai file you just created. When prompted while importing, select “Composition” in the options. Now within that composition select your 2 vector layers and convert them to shapes (right-click > Create > “Create Shapes from Vector Layers”). Now you can control the stroke and individual points just like in Illustrator. As mentioned, with a simple shape like this you could have created them right within After Effects in the first place. Now bring that path segment over to the complete diamond shape and align it with the right side. That will be the starting point of your animation.
Fake 3D – Animating Individual Points
From here you will basically just need one more step and that’s animating the individual path points from one side to another. So go ahead, activate keyframing by clicking on the stopwatch for the path segment. Move the play head over just a little bit and start dragging the individual points to the left side of the diamond shape. Now when you scrub through the timeline you will see the movement of that segment. Now duplicate that layer a few times and stagger it, so you get the illusion of a moving diamond.
To wrap this effect up, select all segment animations and pre-compose them. Now duplicate that pre-composition, right-click and time-reverse this composition. This way it will look like the lines on the other side of the diamond are moving the opposite direction, giving the impression of a wireframe model rotating in 3D space.
That’s it. Now you can add some colors or tweak the opacity of the duplicated composition to fine-tune this effect. Watch the video below to follow this tutorial step-by-step: